Tuesday, January 24, 2012

DIY VDay Canvas


1 comment
Happy Tuesday! Or not happy Tuesday? There isn't a lot that's great about Tuesdays, I know. The weekend is still too far away. But, something great about this Tuesday is that I finally have another project to show you! 
And yes, it is a Valentine's Day project.
Now, I realize some people don't like Valentine's Day, which I think has to do a lot with the fact that they don't have a significant other to celebrate with, otherwise they would probably like it. But honestly, what other holiday, or any other time really, is it acceptable to decorate with pink and red and make your house all girly. This is not a trick question - there is no other time where this is acceptable. Which is why I take advantage of VDay (and also because it's acceptable to eat an entire box of chocolate by yourself without judgment..I think). But anyways, let me get on to today's project.


And just in case you like it enough to make one, I'm going to do my best to show you how.

What you need:
Blank canvas
Freezer paper
Cricut or Exacto knife and cutting pad
Red paint and foam brush
Pink Ribbon
Hot glue gun

Steps:

Take a piece of freezer paper and cut out "Happy" and "Valentine's" with your Cricut or with a template and an Exacto knife. For the Exacto knife method, see this post. Make sure you cut the words on one line so the whole word is together. Also make sure the slick part of the freezer paper is on the bottom when cutting.


Lay your newly made "stencils" on top of your canvas.
Iron down the freezer paper so it adheres to your canvas. Don't forget the little dots between the letters that have holes!

Then, just like you would a stencil, lightly dab paint over your words. This took two coats for me. You also may have to touch it up a little after it dries and you pull it off, and for that I used a white paint marker.)


For the heart, all I did was make a bunch of little rosettes with ribbon. There are several tutorials for this, but basically, you cut a strip of ribbon (mine were probably 12" each), tie a knot at one end, and then start rolling and twisting from the knot.  Add a dab of hot glue every now and then so it doesn't come unraveled.

I printed out a heart template and traced it to my canvas so my heart didn't turn out lop-sided.
Then I hot glued my rosettes to the heart outline. I decided not to fill in the heart because it would have taken too much ribbon. And plus, it saves a lot of time!


But there you have it! You officially know how to make your own VDay canvas. So, go decorate your house all girly and while you're at it, eat an entire box of chocolate so I can feel better about myself! :)


Thursday, January 19, 2012

Cucumber Tomato Salad


5 comments
In my attempts to be healthy and get in shape for the wedding, I've been eating out less and cooking more at home. I've also been trying to eat more vegetables. One of my favorite things is the cucumber tomato salad from Tazikis. So, I decided to take a shot at making it. I've tried to make it before, but used balsamic vinegar. It was good, but it wasn't the right flavor. So, this time I tried to find a recipe that used apple cider vinegar. But I couldn't find any recipe I really liked or had all the stuff for. So I decided to wing it. I NEVER wing recipes, but I did it anyways and it turned out to be amazing (surprisingly). So I wanted to share my spin on the recipe.


Ingredients

3 cucumbers
3 Roma tomatoes
1/2 Purple onion
1/4 cup olive oil
4 tbsp apple cider vinegar
1 tsp salt
1 tsp black pepper
1 tsp garlic salt
Feta cheese

Preparation

Dice the cucumbers and tomatoes and place into a large bowl
Slice the onion into rings and place in bowl
Add the oil, vinegar, salt, pepper, and garlic salt
Stir all the ingredients until everything is coated
Sprinkle Feta cheese on top to your liking
Marinate in the fridge for 1-2 hours
Enjoy!


Wednesday, January 11, 2012

Hobs Lobs Craft


No comments
This past week has been full of cardio, cardio, cardio. (And I don't mean  the exercise kind, although, I've been doing a little of that, too). I've started studying even more than usual, ergo, I have had less and less free time. Depressing. But, no matter how busy I get, I will always schedule "me time." If I didn't, I'm quite positive I would lose my sanity (and be depressed, probably do worse in school, end up failing out, have to start flipping burgers and folding jeans everyday (not that there is anything wrong with that - it just won't pay off these loans), and then live a life of sadness never being able to craft again because all my money will be spent slowly paying off $50,000). You see where I'm going with this?
Bottom Line: "Me time" is important. Really, it's important for everyone's health. (Not my "me time"...your "you time")

My most recent trip to Hobs Lobs was during the "After-Christmas-everything-is-practically-free sale"
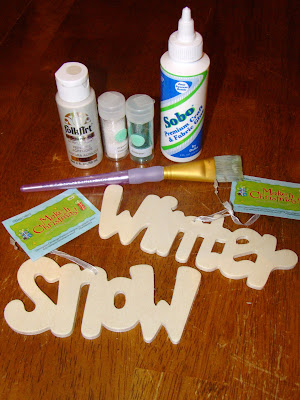
During my search, I found these cute little unfinished wood ornaments.


Since they say "winter" and "snow" I thought they would make cute little winter door-knob decorations for the apartment. Best part, they were only 20 cents each.
Going back to the beginning of this post, I decided these would be fun and quick to finish during my down time. So, that's what I did this week. Pretty much all I did this week, actually. (Aside from studying).
Decided to throw some winter-esque paint on them and follow that up with some glitter. Because glitter makes everything better. (Everyone should know this. It's like, the most important law in crafting. Like the law of gravity is to our everyday life.) Yeah, I went there.

Here's what they ended up looking like: 


Hanging in it's new home
(I didn't think about the fact my doors are all white until after I had painted them. Go figure)


Honestly, what would I/we do without Hobby Lobby? Hmm, the thought alone is too difficult to imagine. ;)
Happy Wednesday!


Wednesday, January 4, 2012

Bracelets


5 comments
Speaking of crafts (I did in my last post), I completely forgot about a craft I did over break until now.
It's a craft I found on Pinterest a looooong time ago that I started a while back and finally got around to finishing it.  The tutorial, from Yellow Blackbird, was inspired by a bracelet from Anthropologie. And to be honest, I love hers so much more than the original. Which led me to make my own.  I linked her tutorial because it's a much better tutorial than I could ever make, and she also has a ton of other cute projects you should check out!

Here's her version


And here's my version


My bangles came from Forever 21 and my hemp and rhinestones from Hobby Lobby. I could only find dark colored hemp (brown, navy, black) so I just went with the navy
There was enough hemp in one pack for all three of my bracelets.
I also decided to do 8 rhinestones instead of 4 so there would be more bling :)

Make some of your own to wear or give as gifts!
Happy Wednesday


LinkWithin

Related Posts Plugin for WordPress, Blogger...